
Getting Started With SQL Server
Necessary Environment
To work with any DBMS, we usually have to have at least 4 components:
- Database Provider (Server). It reads & writes a database on HDD/SSD, renders SQL, and provides local or remote access to data.
- Database Management Tools (Editor). It allows us to work with database via Server. It can be divided into 2 separated modules – command shell and GUI.
- Library which allows us to work programmatically with Editor or with Server. It isn’t required, we can automate Editor or Server via command line, Accessibility API, COM, etc. But it’s very desired, it’s obvious.
- IDE which allows us to use this library of this version.
For SQL Server Express 2008 R2, the compatible “Library” is already included in the .NET Framework (starting at least from 2.0) in the ADO, it is System.Data.SqlClient assembly.
Compatible IDE is any Visual Studio which allows us to use .NET Framework. I am using Visual C# 2008 Express.
We should install only “Server” and “Editor“. We can download them from https://www.microsoft.com/en-US/download/details.aspx?id=30438 page.
“Server” is in SQLEXPR_***_***.exe file (i.e. SQLEXPR_x86_ENU.exe). It is named “SQL Server Database Engine”.
“Editor” is in SQLManagementStudio_***_***.exe (i.e. SQLManagementStudio_x86_ENU.exe). It is named “SQL Server Management Studio Express”.
Also, we can download a prepared “Server” + “Editor” bundle, named SQLEXPRWT_***_***.exe file (i.e.SQLEXPRWT_x86_ENU.exe). “WT” means “With Tools”. It saves our installation time.
On Windows x64, we can use x64 or x86 version. AFAIK, both of them work normally.
Preparing Server & DB
We should use SQL Management Studio to create a DB.
First Connecting To Server
0. Let’s run SQL Server Management Studio.
It should be located in Start Menu (Microsoft SQL Server 2008 R2 -> SQL Server Management Studio), or at this path i.e.:
C:\Program Files (x86)\Microsoft SQL Server\100\Tools\Binn\VSShell\Common7\IDE\Ssms.exe
or
C:\Program Files\Microsoft SQL Server\100\Tools\Binn\VSShell\Common7\IDE\Ssms.exe
If you can’t find it (but can find sqlservr.exe at path \Microsoft SQL Server\MSSQL10_50.<your_instance_name>\MSSQL\Binn), it probably seems what you installed SQL Server (“Server”) but not installed SQL Server Management Studio (“Editor“). Just download SQLManagementStudio_x86_ENU.exe orSQLManagementStudio_x64_ENU.exe (for Windows x64) from https://www.microsoft.com/en-US/download/details.aspx?id=30438 and fix it.
In your first SQL Server installation, I recommend just press “Next” button on every window and keep all settings default.
1. After a few seconds, we will see “Connect to Server” window.
(If we are not seeing it or we lose it, you can open it by “File -> Connect Object Explorer”, by “New Query…” button on toolbar, many, etc.)
Server type should be kept as “Database Engine”, not “SQL Server Compact”.
Server name should be set as your actual server name (according to settings selected in installation). Often it is.\SQLEXPRESS or localhost. If you aren’t sure that we know a right server name, we can popup this combobox, click “<Browse for more…>”, select an available item in “Database Engine” node, and press OK.
Authentication should be set according to settings selected in installation. Usually it is Windows Authentication.
When you set all fields, press Connect button and wait.
If all right, the connection should be established for 5-10 seconds.
Troubleshooting: Can’t Connect To Server
When we try to connect to server, we can see such (or like) error window:
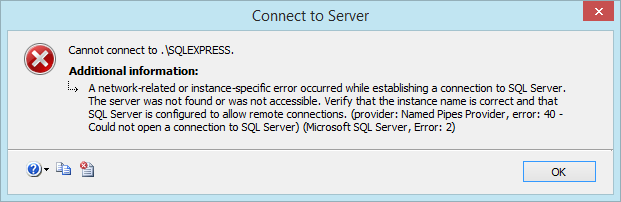
Provider: Named Pipes Provider, Error: 40 – Could not open a connection to SQL Server (Microsoft SQL Server, Error: 2)
Hypothetical Cause: SQL Server service is not running.
Solution: Run “MSSQLSERVER” or “SQL Server (MSSQLSERVER)” service. To open services list, use Win + R -> services.msc, or Control Panel.
Provider: SQL Network Interfaces, Error: 26 – Error Location Server/Instance Specified
Hypothetical Cause: Incorrect Server name
Solution: See First Connecting to Server, point 1.
Creating DB
- When you successfully connected, in “Object Explorer” window, right-click “Databases” node, and click “New Database…” menu item.
- Now you seeing “New Database” dialog.Enter a database name. Let’s set it to “
Bookstore“.Press OK button.
Wait a few seconds.
Tip: Instead of OK, we can use “Script” button to prepare a generated SQL script which creates this DB, and open it in a window, copy to clipboard, or save to file. Next, we can execute it to create a DB.
- Expand “
Databases” node. If all right, we will see the “Bookstore” item inside it.
Designing Table
- Expand “
Bookstore” node. - Right-click “
Tables” node, and click “New Table…” menu item. - Now we should design the columns of the table.Next, right-click this column’s row and click “Set Primary Key” menu item, to make this column primary.
At end, in Column properties” window, expand “Identity Specification”, and set “(Is Identity)” to Yes, to make this column auto-increment.
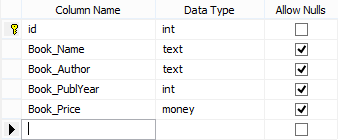
- Let’s create our primary key counter column. Let’s set Column Name to
id, and Data Type toint. - Create a column named “
Book_Name“, of type “text“. - Create a column named “
Book_Author“, of type “text“. - Create a column named “
Book_PublYear“, of type “int“. - Create a column named “
Book_Price“, of type “money” (it’s afloatdata type, i.e. 1 dollar 20 cents – 1,20)
- Let’s create our primary key counter column. Let’s set Column Name to
- Result table’s structure:
- To save changes, press “Save” button on toolbar, type a table name (i.e.
Books), and press OK. - Expand “
Tables” node. If all right, we will see the “dbo.Books” item inside it.
Inserting Data into Table via Designer
- Let’s right-click on “
dbo.Books” node, and click “Edit Top 200 Rows” menu item. - We will see a window with editable grid. For add row, we should select a last row (with
NULLvalues) and set its values.- Set
Book_NametoADO.NET For Beginners
(Do not worry about red circles with “!”, it just indicates what cell’s value isn’t yet saved) - Set
Book_AuthortoRou1997 - Set
Book_PublYearto2015 - Set
Book_Priceto1,25 - Press Enter to save a row.
- Set
- Now we can see our table. Let’s right-click on “
dbo.Books” node, and click “Select Top 1000 Rows“. - We will see a table with 1 row, with entered values.
Tip
Also, of course, you can use this grid to delete and edit rows.
Inserting Data Into Table Manually (via SQL)
- Let’s right-click on “
dbo.Books” node, go to “Script Table as” -> “Insert To” -> “New Query Editor Window…”. - Press Connect button.
- We will see a SQL query window with automatically generated INSERT query.Let’s set all columns’ values, according it:
Hide Copy Code
INSERT INTO [Bookstore].[dbo].[Books]
           ([Book_Name]
           ,[Book_Author]
           ,[Book_PublYear]
           ,[Book_Price])
     VALUES
           ('ADO.NET For Professionals',
           'Rou1997',
           2015,
           100)
GO
- Press “
Execute” button on toolbar. - If all right, we will see 2 messages: “
Query Executed Successfully” and “(1 row(s) affected)“. - Now we can see a table via “
Select Top 1000 Rows” menu item.
Tip
Also we can just click “New Query” button on toolbar, to open a SQL scenario window, type all SQL manually, and execute it.
Writing Client In C#
Including Library To Project
As mentioned above, we are requiring System.Data.SqlClient namespace.
This namespace included in System.Data.dll, this is referenced by default, therefore we don’t need to add this reference manually.
But we should add using to this namespace:
using System.Data.SqlClient;
Connecting To Server (Using Windows Authentication)
SqlConnection conn;
conn = new SqlConnection("Server=<server_name>;Database=<db_name>;Integrated Security=True;");
or:
SqlConnectionStringBuilder connBuilder = new SqlConnectionStringBuilder();
connBuilder.DataSource = <server_name>;
connBuilder.InitialCatalog = <db_name>;
connBuilder.IntegratedSecurity = true;

SqlConnection conn;
conn = new SqlConnection(connBuilder.ConnectionString);
<server_name> may be ./SQLEXPRESS or localhost (or just point – .), or your SQL Server instance’s name set during installation.
Getting Data From Table To Grid
SqlDataAdapter adapter;
adapter = new SqlDataAdapter("SELECT * FROM [<table_name>]", conn);

DataTable table;
table = new DataTable(); // Don't forget initialize!

adapter.Fill(table);

if (table.Columns.Contains("id"))
{
    table.Columns["id"].ReadOnly = true;
}

new SqlCommandBuilder(adapter); // For automatic generate INSERT, UPDATE and DELETE queries for saving modified data in grid

dataGridView1.DataSource = table;
Saving Modified Grid
adapter.Update(table);
adapter is our current SqlDataAdapter.
table is our current DataSource of grid.
Result: Full Code With Comments To Copy-Paste
 Copy Code
using System;
using System.Collections.Generic;
using System.ComponentModel;
using System.Data;
using System.Drawing;
using System.Linq;
using System.Text;
using System.Windows.Forms;
//--------------------------
using System.Data.SqlClient;
namespace SQL_Server_2008_R2__Visual_Studio_2008_
{
public partial class Form1 : Form
{
SqlConnection conn;
SqlDataAdapter adapter;
DataTable table;
public Form1()
{
InitializeComponent();
}
private void BtnConnect_Click(object sender, EventArgs e)
{
// --------------- Connecting To Server & DB ----------------
// -------------- With Windows Authentication ---------------
conn = new SqlConnection("Server=" + CmbServer.Text + ";Database=" + TxtDatabase.Text + ";Integrated Security=True;");
// ----------------- Opening The Connection -----------------
// ----------------------------------------------------------
// I.e. Opening DB's File for Reading And Writing.
// SqlDataAdapter cans do it automatically on Fill().
// But, if you would also use SqlCommand, or GetSchema(),
// you should Open DB Manually.
conn.Open();
// ---------- Get All Tables From DB to ComboBox -----------
// ---------------------------------------------------------
// There "Tables" is a system table which contains info
// about tables in DB.
// "TABLE_NAME" field in "Tables" contains table names.
using (DataTable tables = conn.GetSchema("Tables"))
{
for (int i = 0; i < tables.Rows.Count; i++)
{
CmbTables.Items.Add(tables.Rows[i].ItemArray[tables.Columns.IndexOf("TABLE_NAME")].ToString());
}
if (CmbTables.Items.Count > 0)
{
CmbTables.SelectedIndex = 0; // Default selected index.
}
}
groupBox1.Enabled = true;
}
private void BtnShow_Click(object sender, EventArgs e)
{
// --- Putting All Data From Selected Table To DataTable ---
// ---------------------------------------------------------
// In simply put, DataTable is just matrix (2-dimensional array)
// which stores data of the table.
adapter = new SqlDataAdapter("SELECT * FROM [" + CmbTables.Text + "]", conn);
table = new DataTable(); // Don't forget initialize!
adapter.Fill(table);
// ---------- Disabling Counter Field For Edition ----------
// ---------------------------------------------------------
// Because it can throw exception.
if (table.Columns.Contains("id"))
{
table.Columns["id"].ReadOnly = true;
}
// ------------ Making DataBase Saving Changes -------------
// ---------------------------------------------------------
// SqlCommandBuilder automatically generates
// necessary INSERT, UPDATE, DELETE SQL queries.
// Next we just have to run the
// adapter.Update(mTable);
// and all changes in the table will be saved to DataBase.
new SqlCommandBuilder(adapter);
// ----------- Binding DataTable To DataGridView -----------
// ---------------------------------------------------------
// DataGridView visualizes DataTable's data in the window.
dataGridView1.DataSource = table;
}
private void Form1_FormClosed(object sender, FormClosedEventArgs e)
{
// -------- Saving Modified Data To Selected Table ---------
// -------------------- On Form Closed ---------------------
// ---------------------------------------------------------
if (adapter == null) // If No Table Selected.
return;
adapter.Update(table);
}
private void dataGridView1_DataError(object sender, DataGridViewDataErrorEventArgs e)
{
// - Preventing PEEESKY DataGridView Default Error Dialog --
// ---- When we trying set a non-int value to int field ----
// ---------------------------------------------------------
// Just handle DataError event. It's enough.
// But if you want, you can to show your own error message.
// Not so peeeeesky, please!!! :)
}
}
}
Getting Started With Entity Framework
Result: Full Code With Comments To Copy-Paste
Copy Codeusing System;
using System.Collections.Generic;
using System.ComponentModel;
using System.Data;
using System.Drawing;
using System.Linq;
using System.Text;
using System.Windows.Forms;
namespace SQL_Server_2008_R2___Entity_Framework__Visual_Studio_2008_
{
public partial class Form1 : Form
{
BookstoreEntities context = new BookstoreEntities();
public Form1()
{
InitializeComponent();
}
private void Form1_Load(object sender, EventArgs e)
{
dataGridView1.DataSource = context.Books;
}
private void BtnInsert_Click(object sender, EventArgs e)
{
var book = new Books();
book.Book_Name = "ADO.NET For Professionals";
book.Book_Author = "Rou1997";
book.Book_PublYear = 2015;
book.Book_Price = 100;
context.AddToBooks(book);
context.SaveChanges();
}
}
}
